Home Lab: TCP Port Scanner
This first cybersecurity home lab consists of querying the state of connections to a target machine through TCP ports. It covers configuring the target machine so that it can be scanned by the attacker machine. Basic services such as web, SSH, and FTP will be exposed.
Architecture
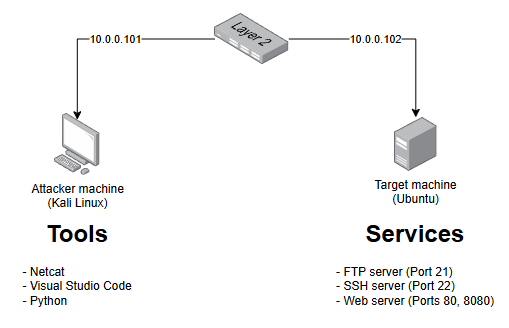
Both machines share the same layer 2 network:
- Attacker machine (Kali Linux):
10.0.0.101 - Target machine (Ubuntu):
10.0.0.102, exposing FTP (port 21), SSH (port 22) and web (ports 80, 8080)
Toolbox
- Kali Linux: attacker machine
- Ubuntu Desktop: target machine
- Visual Studio Code: code editor
- Python: scripting language
Implementation
Target Machine
We start by checking connectivity with the attacker machine using the ping command. Next, we check the active connections on our machine with the ss command. For this lab, we install 3 services: SSH, web, and FTP.
ss is used to dump socket statistics. It allows showing information similar to netstat. It can display more TCP and state information than other tools.
-n, --numeric: do not try to resolve service names.-l, --listening: display only listening sockets (these are omitted by default).-p, --processes: show process using socket.-t, --tcp: display TCP sockets.
Before installing anything, ss -tlnp shows only two local services: the DNS resolver (systemd-resolved, port 53) and the CUPS printing service (port 631). Both listen on loopback addresses only, so they are not reachable from the network.
Then we install OpenSSH Server, Apache2 and vsftpd. Apache and vsftpd start automatically, while the SSH service has to be started manually. Running ss again confirms three new services listening on all interfaces:
- Port 21: vsftpd (FTP)
- Port 22: sshd (SSH)
- Port 80: apache2 (HTTP)
Finally, we configure the UFW firewall: we allow ports 21, 22 and 80, reject port 8080, and enable it. Any other incoming connection falls under UFW’s default deny policy.
Attacker Machine
Likewise, we check connectivity with the target machine using the ping command, to rule out network configuration issues. Then, we use the netcat (nc) tool to find out the connection state of the ports.
netcat is a simple Unix utility which reads and writes data across network connections, using TCP or UDP protocol. It is a feature-rich network debugging and exploration tool.
-v: verbose (use twice to be more verbose).-z: zero-I/O mode (used for scanning).
Before enabling the firewall, nc -zv reports ports 21, 22 and 80 as open, while ports 53, 631, 8080 and 9999 return connection refused: nothing is listening on them from the network side.
After enabling the firewall, port 21 is still open and port 8080 is still refused, now because of the reject rule. Port 9999, however, changes to connection timed out, because the firewall silently drops the packets.
Results
With the Python script, we built a program that queries the state of the target server’s ports. The results show that ports 21, 22, and 80 are open, while port 8080 was refused and port 9999 timed out.
| Port | State |
|---|---|
| 21 | open |
| 22 | open |
| 80 | open |
| 8080 | refused |
| 9999 | timeout |
Lessons learned
- There are differences between the reject and deny firewall actions, so it is necessary to understand the behavior of each one: with reject, the firewall actively answers the connection attempt with a TCP RST, so the scanner receives an immediate “connection refused” and reports the port as closed, whereas with deny, the firewall silently drops the packet without any response, so the scanner waits until its timeout expires and reports the port as filtered.
Next steps
- Implement validation for network port input.
- Implement handling for connection losses.